If you are planning to get started with WordPress and want to find out how to install WordPress on your web hosting, then this article is for you. In the article, we will go through a step by step guide on how we can download and install WordPress on your web hosting servers.
Prerequisites
Here are some prerequisites that you need to fulfill before you can set up your WordPress website.
- Registered Domain Name ( You can register a domain name from Godaddy )
- A Web Hosting Server. You can get Server from different hosting providers. Some of the good web hosting services are listed below.
- GoDaddy
- iPage
- Blue Host
- Hostinger
- Hostgator
- If you are looking for a cost-effective web hosting plan, click here to purchase.
- WordPress Installation files. That can be downloaded from this link (Download WordPress)
Buy a complete guide to WordPress for Beginners 2019. A complete step by step guide.
Step 1
The very first step is to download a copy of WordPress onto your computer. To do this head over to this link to download WordPress files.

Click the Download WordPress Button. You will be redirected to another page. Click the Download WordPress (Version number). A zip file will be downloaded to your computer.

Step 2
Once you have completed downloading WordPress, the next steps are to do WordPress upload to your hosting server. To do this head over to your web hosting control panel, and look for File Manager.

These options are the same for all the Hosting Panels, but with a slight difference in the layouts. Click on File Manager to continue. An interface will open up showing you current files on the server.

The downloaded zip file has to be uploaded here. An important point to note here is that every hosting panel will be having the same options but there might the change in layout. So don’t get confused/worried if you don’t see such kind of screen.
Chose the zip file to be uploaded and click upload.

Once your file is uploaded, you will see it in your file manager. Currently, if you open your website you won’t see any changes. Because we are not yet finished. We need to extract the zip files on our server.

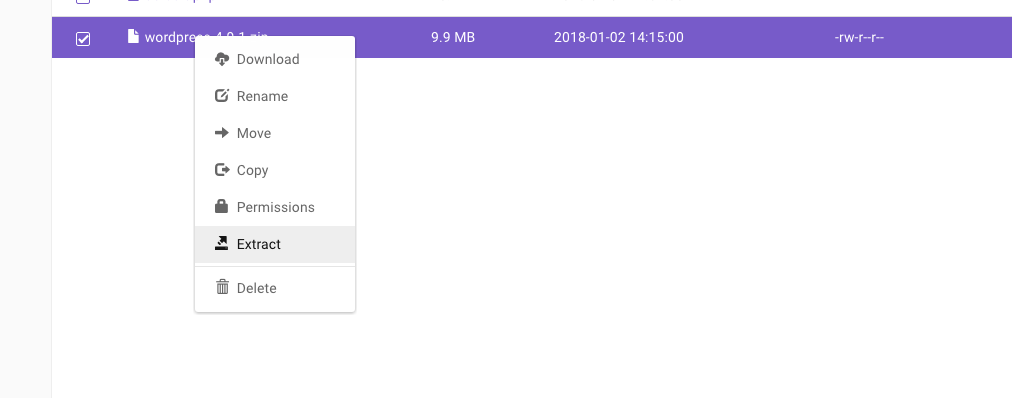
Right click on the zip file and click Extract. It will be extracted to a folder WordPress. If you open your website now, still you won’t see any changes. Because WordPress files are not configured properly yet. To do this click on the extracted folder, you will find the number of files.

You need to move all these files to the public_html folder. Select all the files and click move.
When you click on the move button, you can choose where to move these files. Make sure you move these files to correct root directory. You can select the root directory by clicking the Change button. In my case it’s public_html. Most of the hosts will have it in the same way. But if you are installing it on a subdomain, make sure you chose the correct subdomain folder. In most cases, the folder name is the same as the name of the subdomain.
Click the Move button. All the files will be in your root directory.
Step 3
Now that we are done uploading WordPress, the next step is to install it. Now go to your website and you will now see the following screen in front of you.
This is the very first page you will see when you are going to install a fresh copy of WordPress. You can select a language from here. Let us select English and click continue.

In the next steps, you will see this message. You need to provide all the details related to your database. Click on Let’s Go!
We need to provide the correct database information or else our installation might fail. Let’s set up the database.
To do this head back to your control panel, and look for Database section. The database options are the same for all the host but the slight difference in layout might be noticed depending on your host.
Click on MySQL Database. Provide your database name, database username, and database password and click create.
Once your database is created you will be able to see the information as shown below. Its same for every host but a slight difference in layout might be noticed on different hosts.
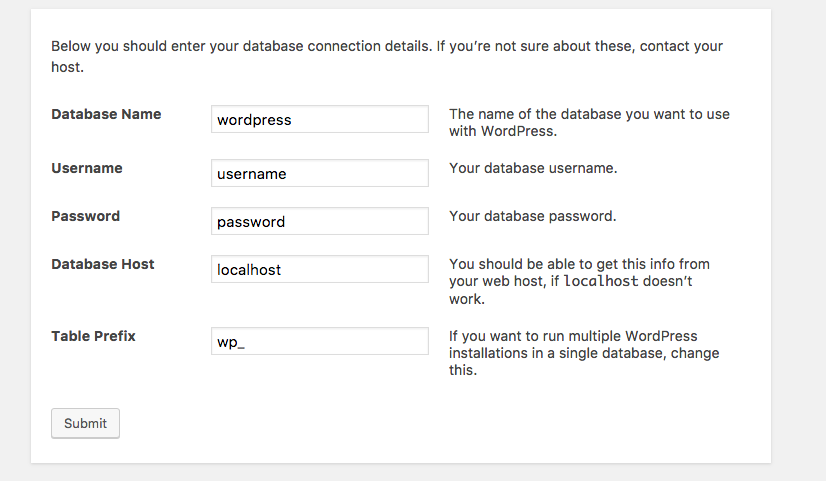
We will now use this information and provide it in the WordPress installation interface. Click the submit button to continue. In database host option you can keep the Database server as localhost if its website and database both are on the same servers.
If everything is correct, WordPress will show you with a success message screen as shown below. Click the run installation button to start your installation.
Upon successful installation, in the next steps, WordPress will ask you to provide basic information related to your website. Provide the following details here
- Your website name
- Username. You will use this name as login name
- Password. If WordPress gives an indication of a weak password. Just checkmark “Confirm use of weak password”
- Your email id in case you forget your password, you will use it to reset it.
Click on Install WordPress.
On successful completion of the process, you will see the following message.
Congratulations..!!. You have successfully completed the WordPress installation on your web hosting server. You can log in to admin panel with username and password you provided at the time of installation, to configure your website.
Now head over to your website, you will see the following homepage, showing that WordPress is up and running.
To open up your admin panel just add the following link after .com . “wp-admin“.
That’s All Folks! You successfully completed the WordPress installation. If you do still face any issues while setting up your WordPress website, you can always comment below with your quires and get answered by experts. 🙂
- Design


